Friday, July 29, 2011

The Outlawz Copic Challenge Guest Designer #5

     Well, this is my last card as a Guest Designer at The Outlawz Copic Challenge.  I've had so much fun there this past month.  Everyone has been so friendly and supportive and I got to chit chat with a lot of new people.  It's been a blast Outlawz girls!  Thanks so much for having me!
     I won some images from Meljen's Designs a while back and this is one that I picked out.  I just thought these little piggies were so cute.  I used some papers from Cosmo Cricket's Wanted collection to go along with the "building" theme you usually associate with three little pigs.  :-)  The actual theme of the challenge this week is Anything Goes.  Hmmm . . . I wonder just what kind of music he's playing on that fiddle?  :-)  Probably some bluegrass.  Maybe I should have called them the Soggy Bottom Boys.  They are pigs after all!  LOL  Do you think that one on the right has George Clooney's eyes?  :-)
     Hope you like my partyin' piggies!

I'd like to enter these little guys into the following challenges:

Aud Sentiments--sentiment that makes someone smile
Charisma Cardz--four legged friends
Creative Card Crew--animal antics
Die Cut Dreams--animal antics
Crafty Emma--humor/funny
Stampin for the Weekend--anything with four legs

     Have a fabulous weekend!


Supplies

Papers:  Cosmo Cricket, Recollections, X-Press it Copic Blending Card
Stamp:  Meljen's Designs "Three Pigs"
Ink:  Frayed Burlap Distress ink
Copics:
            skin E000, E00, E01, E02, R20
            clothing BG01, BG02, E07, E08.BG93, BG96, E31
            fiddle E31, E37
            hammer E37, CO, C2
            shading W1, W3
Miscellaneous:  Recollections brads, jute hemp cord, and buttons from my stash

Wednesday, July 27, 2011

Hello Friend

Third post for today, so if you missed my tutorial for The Kraft Journal or my card for this weeks Papercraft Star challenge, please click on the links.
     Well, this card is an experiment of sorts since I was trying to improve my skills at coloring pleats and folds.  Let's just say I need a lot more practice.  LOL  It was also a little break from my mini album project I gave you a sneak peek at.  I'll have another peek coming up soon.
     The image is from Phindy's Place and the papers are from a brand new 6 x 6 pad of Bo Bunny's Gabrielle that I purchased recently.
     I added a lot of machine stitching cause I love to stitch on my cards.  There's also some pretty antique lace that I caught on sale at Joann's.  The butterfly was punched with a Martha Stewart punch, once out of vellum and secondly out of a dictionary page.  Both layers were painted with Creative Inspirations Paint in a pretty sea foam color.  The paint is so pretty and sparkly and a little goes a long way!
     I'd like to enter the little friends in the following challenges:

Phindy's Place--doubling up (2 brads, 2 roses, 2 ribbons. 2 layers on the butterfly)
Crafty Cardmakers--flutterbies
Stamp Something--embellish it
Little Darlings--girly

Thanks for popping in!


Supplies

Papers:  Bo Bunny Gabrielle, Bazzill, Recollections, Copic X-Press It Blending card, Kraft Outlet Vellum, Kraft Outlet Vintage Dictionary Pages
Stamp:  Phindy's Place "Birdie", Stampendous "Notes for a Friend"
Ink:  Vintage Photo Distress ink, Versafine Vintage Sepia
Copics:  B91, B93, B95, BG10, E000, E00, E11, E13, E41, E43, E47, E71, E74, E79, R21, R22, W1, W3, Y35
Tools:  Nestabilities Classic Squares Large (S4-126) and Standard Circles large (S4-114), Martha Stewart butterfly punch, sewing machine
Miscellaneous:  The Paper Studio brads, Recollections pearls and mini roses, Offray ribbon, lace from Joanns

Christmas Tag Tutorial for The Kraft Outlet

If you're looking for my Papercraft Star Challenge #55 post for today, please go here, and I have a for fun card posted here also.
     It's my turn again this week to bring a tutorial for the Kraft Journal readers so I have taken a step by step look at creating a special little holiday tag.
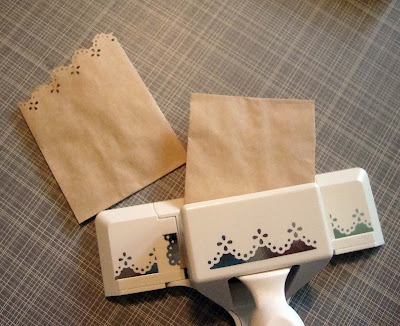
     For the first step I used a Mini Kraft Merchandise Bag and sliced off the fringy top at at angle.  I then used a decorative edge punch along the cut edge to create a cute tag pocket.  Since the bags are so thin, make sure you really squeeze your punch hard or you might even try adding an extra layer of plain paper to add a little thickness for punching.
     The large Grungy Prim Tags fit perfectly in these little bags.  I trimmed a small amount off of the bottom for my project.
      Next I stamped a Christmas tag stamp onto the Grungy Prim Tag with some sepia ink.
     I wanted to dress the tag up a little bit so I masked off the stamped area and used Versamark and embossing powder to add some snowflakes to the perimeter of the tag.
     To make the snowflakes pop, I sponged on a little Aged Mahogany Distress ink and then Vintage Photo and wiped the excess ink off of the embossing.
     To add some interest to the Buff French "Carte Postale" Postcard Shipping Tag, I used some gel medium to add torn pieces of Vintage Dictionary page to the tag.
     As you can see, some of the gel medium leaked out from under the Dictionary page, but I really like how it looks.  I inked the entire tag with Vintage Photo and then used Black Soot Distress ink to give it a singed look.  I stamped a postmark stamp using Fired Brick Distress ink in the corner.
     Time to put the tag together with all the little extras!
     First I added the punched pocket and tag.  I tied some Red Bakers Twine around the pocket.  Next came the little bear image that I matted on some Lunch Bag Kraft Cardstock.  On it's left, I tucked a little lace under the edge and glued on a Christmas Epoxy Brad which I broke the prongs off of.  The ticket was printed on my computer using a digi that my sweet friend Dana has for free on her blog here.  I just added the sentiment in Photoshop, printed it out in red onto some Brown Kraft Cover Weight cardstock, trimmed it, and used a ticket corner punch on the ends.  I added a piece of Twill Tying Tape through the postcard tag hole and last, but not least, some punched holly leaves complete with berry pearls that I colored with a Copic marker to match.  All the pieces were edged with Vintage Photo and Walnut Distress Stain inks.
      I'd like to enter James the bear into the following challenges:

Winter Wonderland--holly and/or ivy
Polka Doodles--Christmas in July
Class Act Insider--Christmas
Sugar Creek Hollow--tags
Stamptacular Sunday--pockets
Creative Inspiration Paints--inspired by Christmas
Creative Inspirations--Christmas in July
iCopic--anything but a card
Pollycraft Monday--Christmas in July
A Spoon Full of Sugar--tags

Hope you found something to try in the tutorial. Have a great week!


Kraft Outlet Supplies

Buff French "Carte Postale" Postcard Shipping Tags
Vintage Dictionary Pages

Twill Tying Tape
Grungy Prim Tag
Mini Kraft Merchandise Bag
Red Bakers Twine
Brown Kraft Coverweight cardstock
Lunch Bag Kraft cardstock
Christmas Epoxy Brads

Supplies from my stash that can also be purchased at Kraft Outlet

Vintage Photo Distress ink
Walnut Stain Distress ink

Other Supplies

Paper:  Copic X-Press It Blending card
Stamps:  Lili of the Valley "James Bear in the Snow", Recollections "Snowflake", Making Memories "Passport', Inkadinkado "Christmas Tag Wishes"
Ink:  Memento Tuxedo Black, Versamark, Versafine Vintage Sepia, Black Soot, Fired Brick, and Aged Mahogany Distress inks
Copics:  BV29, E02, E41, E43, E47, G82, R24, R46, R59, YG67
Tools:  Martha Stewart Holly punch and Eyelet Lace edge punch, Stampin' Up Small Ticket Corner punch, Marvy Uchida heat gun
Miscellaneous:  The Paper Studio pearls,  Stampendous White Opaque embossing powder,  Liquid Applique, Claudine Helmuth Studio Matte Finish Multi Medium gel, Diamond Stickles, lace from my stash

Tuesday, July 26, 2011

Papercraft Star Challenge #55

I have multiple posts for today so if you're looking for my Kraft Journal Tutorial click here and I also managed to make a for fun card which you can see here.
     ANYTHING GOES!  Now you can't get much easier than that for a challenge and that's just what we're calling for this week at Papercraft Star!  So dazzle us!  This is the last challenge for this month so that means it's your last chance to get your name in the hat for the Scrapbook Circle Grand Prize.  Next week will start our new sponsor partnership with The House Across the Bay etsy shop.  If you haven't checked it out yet, hop on over there and see what Rilly has to offer.  And guess what she's doing for our Papercraft Star followers--she's going to give away some freebies!  Yep, you heard right--FREEBIES!  After that, she'll provide our weekly prize, so be on the lookout.  :-)
     For my card this week I've used an image from Mo's Digital Pencil, one of my favorite artists.  This is Cherry and she's colored with Copic markers as if you didn't know.  LOL
     Don't forget we're having our DT call at Papercraft Star right now.  That will run through August 4th.  You can check out the post with all the details here if you missed it.
     You have through 6:00 a.m. Monday morning to get your Anything Goes creation linked up.  Can't wait to see what you come up with!  :-)
     I'd like to enter Cherry in the following challenges:

Mo's Digital Pencil--summer vacation
Little Miss Muffett--summer

Happy Wednesday!


Supplies

Papers:  Kaisercraft English Rose collection, Recollections, Copic X-Press it Blending card
Stamp:  Mo's Digital Pencil "Cherry"
Ink:  Tattered Rose and Tea Dye Distress ink
Copics: 
            skin E000, E00, E11, R20
            hair  E29, E31, E37, E39, E47, E50, E51, E53, E57
            clothing R30, R32. E40, E41, E43
            cherries R35, R37, R39, G94
            basket E31, E47, E57
            shadowing  W1, W3
Tools:  Nestabilities Labels Eight (S5-019) and Double Ended Tags (S3-149), sewing machine, Martha Stewart Frond punch
Miscellaneous:  Hug Snug Seam Binding, Wild Orchid, Prima and Recollections paper roses, The Paper Studio brads, Recollections pearls

Monday, July 25, 2011

A little correction on the Papercraft Star DT call and some changes here on my blog

Hi all!

     Hope you're having a fantastic week! 
     I just wanted to correct a possible misconception about our Papercraft Star Design Team Call.  I'm afraid I may have given the wrong impression in the wording that I used for the DT Call requirements and I'm hoping I can correct that mistake, and I apologize if I scared any possible candidates off.  :-)
     The requirements state that each week each DT member would be required to use some of the digital image product from our Sponsor, The House Across the Bay.  I did not mean to imply that that was ALL you could use for your project.  We just want to see something from her store somewhere on your project.  She has tags, inchies, circles, awesome background that are specially made for cardmakers, plus lots more.  There are tons of ways to incorporate a little something digital into your cards, layouts, or alterd/mixed media art.
     So, I apologize for unintentionally misleading you.  I've corrected the wording on the blog post at Papercraft Star also.
     Now, for my blog.  Unfortunately I've had to make a couple of changes with my comment settings lately.  First of all several of you were having trouble posting comments, so I changed to a different posting form and that seems to be working for everyone.  That wasn't such a big deal, but the last few days I've been getting a TON of junky spam comments from an Anonymous sender.  They're not even on my most recent post, but on old ones.  Nothing nasty, thank goodness, just annoying, so I had to go to comment moderation which is rather a pain in itself.  I rather liked the way I had things set up so that whenever I received a comment it went straight to my gmail account to let me know you'd visited.  Now I have to go approve everything first.  ARRRgghh!  I just can't imagine what kind of enjoyment these people get out of sending this junk to people who don't want it.
     Sorry for the venting session there.  :-)  I have slowed down a bit this week in my card making, but I have started a very special mini that I'm making for my daughter.  I'll give you a tiny peek at a itty bitty part of one of the embellishments.  I LOVE making minis, but I get soooo in the zone.  LOL

     I'll have a Papercraft Star projects AND a tutorial for The Kraft Journal both posting on Wednesday, plus my final Guest Designer card for The Ourlawz on Friday so I hope you come back and visit again.
Hugs!
Tracy

Friday, July 22, 2011

The Outlawz Copic Challenge Guest Designer #4

     The challenge this week at The Outlawz Copic challenge is Things with Wings so here's a Lili of the Valley image I've had for a while and finally inked up.  I had some 12 x 12 My Mind's Eye papers, but I just had to go out and buy the 6 x 6 pad (two actually LOL).  We'd love to have you come join in the fun of this weeks challenge with us.  Hope to see you there!

I'd like to enter this card into the following challenges:

Aud Sentiments--anything that will make someone smile/enjoy their day
Craft Us Crazy--anything goes
Do You Stack up?--wings
Dutch Dare--colour inspiration
Moving Along With the Times--cute and cuddly with a punch
Southern Girls--Happy Birthday
Crafts and Me--add a flower
Divas By Design--pastels
Flutterby Wednesdays--butterfly, fairy or angel
Ladybug Crafts Ink TLT--summer birthdays
Cupcake Inspirations--photo inspiration
Mark's Finest Papers--bright and cheery with pink, yellow, and green

Blessings!


Supplies

Papers:  My Mind's Eye, Coordinations, Georgia Pacific, X-Press It Copic Blending Card
Stamp:  Lili of the Valley "Birthday Fairy" and Stampendous "BDay Circles"
Ink:  Memento Tuxedo Black and  Bamboo Leaves
Copics:
            skin  E000, E00, E11, R20
            hair E31, E35, YR20
            clothing BG01, BG02, BG05, BG07, B000
            bear E31, E35, YR20, R20
            present G82, G94, Y04, Y28, Y32, R83
            shading  W1, W3
Tools:  Nestabilities Labels One (S4-161) and Classic Scalloped Circles Large (S4-124), Martha Stewart Vintage Floral edge punch and Frond punch, EK Success 1 1/2" Circle punch, sewing machine
Miscellaneous:  Jolee's pearls, Wild Orchid and Recollections roses, Michaels ribbon, Wright's pearl trim, Crystal and Waterfall Stickles

Thursday, July 21, 2011

Papercraft Star DT Call

Just a little reminder that Papercraft Star's DT Call opened today.  You can check out the post here to see all the details.  We're looking for two new DT members so if you're interested please apply.
Have a wonderful rest of the day!

Tuesday, July 19, 2011

Papercraft Star Challenge #54


     I had a totally different card planned for this weeks Papercraft Star challenge, but I just couldn't get it to work so I just started from scratch--new sketch, new images.
     This cute little mermaid and her shell are some of Make It Crafty's wonderful digi stamps.  I colored her and her clam shell boat with Copic markers.  A clam shell probably wouldn't make a very good boat, but I wanted her floating so it became her mode of transportation.
     I found a new group of sketches that I just love and one of them had some layering at the bottom that looked very much like a beach and waves.  That's when the fun began.  I rarely ever use vellum and don't know why because it's colors are so soft and muted.  Love that!  Anyway, I wanted the water to be soft and I dug out my folder of vellum sheets and luckily had some soft water colors in there.  The base layer is white and I did some chalking on it using a piece of cardstock cut into a cloud shape as a mask.  The chalking is very subtle, but looks wonderful IRL. 

     Next came the waves--a soft green and blue, just randomly torn and layered.  The last layer is some OLD Provocraft paper that had a pattern on it that looks like sand.
     I still need more practice with coloring hair, but it's a little better and overall I'm pretty happy with how Cordelia turned out.
     So, check out the photo inspiration pic on my sidebar for this weeks challenge and let's see what you can do with those colors and a beachy/summer theme.  Get your projects linked up by 6:00 a.m. EST on Monday.
     Be on the look out for some exciting news tomorrow from Papercraft Star.
     I'd like to enter this little cutie into the following challenges:

City Crafter Challenge Blog--beach theme
Clear It Out--use old supplies, anything goes (old paper stack and vellum, the shells are from my stash that were collected in Puerto Rico 26 years ago!)
Paper Minutes--blue, brown, beige
The Stamping Boutique--cool colors
Lexi's Creations--at the beach
Pollycraft--summer fun
Designed 2 Delight--beach/tropical or summer themed
Fussy and Fancy--summer

     Have a great week!


Supplies

Papers:  Vellum, Bazzill, Recollections, Georgia Pacific, Copic X-Press It Blending card
Stamp:  Make It Crafty "Clam Shell" and "Cordelia the mermaid"
Copics:
            skin E000, E00, E11, E13, R20
            hair E31, E35, YR20
            clothing/tail B000, BGO1, BGO2, BGO5, BGO7, G40
            shells E40, E41, E43, R000, R00, R11, R12
Tools:  Martha Stewart Deco Fan punch around the page set
Miscellaneous:  Celebrate It ribbon, flowers and shells from my stash, Inkadinkado Blending Chalks, Pearl Perfect Pearls, Kaisercraft pearls

Last A Day For Daisies Celebration card

     This is my last entry for the A Day For Daisies celebration.  If you were lucky enough to grab these fun freebies then make sure you get your entries in by Thursday on the challenge blog.  Here are the links again for Tammy's store and etsy shop.
     I'd also like to enter this card into the Card Patterns sketch challenge for this week.
     Have a blessed day!


Supplies

Papers: K and Company Classic K Bailey, Recollections, Copic X-Press It Blending card
Stamp:  A Day For Daisies "Happy Birthday Tower"
Ink:  Victorian Velvet Distress ink
Copics:  B000, B00, B02, BV11, BV17, BV20, BV25, BV29, C2, E50, E51, E53, G29, G40, G82, R22, R24, R27, R32, R35, R37, R39, RV10, RV11, Y08, Y17, Y26, YG67, YR68
Miscellaneous:  Studio 112 pearls, Prima e-line flower, Irridescent Gold Glimmer Mist, Basic Grey buttons, Darice Hemp Cord, Celebrate It ribbon

Monday, July 18, 2011

Pinky

     I have several cards, EXTRA cards I want to make and post this week and this is one of them.  The challenge at Mo's Digital Pencil this week is black and white with one other color.  Obviously I've made a pink explosion.  LOL  I used a ton of punches and dies on here and even an embossing folder so I had lots of fun.  The image was colored with Copics and then I added some Stickles and a little Creative Inspirations Paint to her outfit.  For the center piece I first punched a strip with the Eyelet Lace punch and then another smaller piece with a scallop punch.  I added the ribbon and then took the same thread I used to sew on the card to wrap around the scallops.  I popped  a pearl in the center and I was so happy with how it turned out.  I added a little distress ink to the large flower to cut down on it's yellow tone and keep in more in the pink vein.
     Hope you like my little ballerina.  I'd like to enter her also in the Simon Says Stamp "anything Goes" challenge.


Supplies

Papers:  Bazzill, Recollections, Georgia Pacific, Copic X-Press It Blending card
Stamp:  Mo's Digital Pencil "For You", Papertrey Ink "Mixed Messages"
Ink:  Memento Tuxedo Black, Spun Sugar Distress ink
Copics:  C0, C2, C4, C6, R11, RV10, RV21, RV23, RV25
Tools:  Martha Stewart Eyelet Lace punch around the page set, EK Success Scalloped Scallop edge punch, Nestabilities Lacey Circles (S4-293), Standard Circles Large (S4-114), and Labels Four (S4-190), sewing machine, Cuttlebug, Swiss Dot Embossing Folder
Miscellaneous:  Wild Orchid Small Flat Gardenia, Recollections mini roses, ribbon roses, Jolee and The Paper Studio pearls, ribbon from my stash, Rose Quartz Creative Inspirations paint, Diamond and Cotton Candy Stickles

The Kraft Journal Challenge #28

Warning!  Photo Heavy  :-)

     This week at The Kraft Journal we are spotlighting the Lunch Bag Kraft CD Sleeve envelopes that Babette carries in the Kraft Outlet store for our "My Favorite things" challenge.  You guys know I like to make mini albums and these sleeves make perfect pocket pages.  This album is absolutely chock full of KO products so rather than try to connect links throughout my description of the pages, I've just created a master link list at the end.  See something you like?  Just click on the link and it will take you straight to the item in the KO store.  Everthing in bold italicized print is in the store.
     My theme is "Collect" and this album is about my love of glass objects.  Glass has fascinated me since I was a kid, especially smaller older pieces.  I'll explain each collection as we go through the pages.
     My bestie bloggie buddy Jan sent me some beautiful 7 Gypsies papers about a month ago and I decided they would be the perfect background papers for my album.  They're all distressed on the edges and inked with distress inks.
     The cover has some distressed Vintage Dictionary pages, distressed and inked Lunch Bag Kraft cardstock, Tim Holtz Salvage Stickers, and 7 Gypsies Mini Gypsy Ephemera Labels.  I also wrapped it with some Earthy Hemp Cord and added a charm from my stash.
          I printed out a word definition onto some Buff Ivory Cover Weight cardstock for most of the pages.  The first one is "collect" and the page includes more of the Lunch Bag Kraft cardstock (there's some on each page with some Vintage Photo Stickles smeared on), some twill tape, a Jenni Bowlin Studio chipboard milk cap and Vintage Black Journaling card, and a Tim Holtz Salvage sticker (bottle cap) from the Lost and Found sticker collection that I stuck on a small circle of Brown Kraft Cover Weight cardstock and attached with a Tim Holtz Memo Pin into the Twill tape.
     Page two contains a pic of my small bottle collection.  Our home is on land that's been in the family forever and all of these bottles were found around the property.  There's another Tim Holtz Salvage sticker for Tincture Iodine.  I thought that fit pretty well since most of these are medicine bottles.  I used a Tim Holtz Hinge Clip to attach a Round Metal Edge Grungy Prim Tag that I added a 7 Gypsies Steampunk Time Rub-on to.
     Page three is a pic of my glass chicken/rooster collection, well part of it.  LOL  There's some more of the Earthy Hemp Cord wrapped around this page and a button from my stash with the hemp cord tied on Audrey style and some Stickles.  You can also see that I ran some of the hemp cord and twill tape through the center of the album.  It's tied in a simple knot on the outside.
     Page four has a pic of my glass giraffe collection.  The small blown glass animals are my favorites, but they're tough to find.  I'm kind of picky about my critters.  They have to be made a certain way.  I don't like the faceted stuff and the older the better.  There's a Prima flower and some metal brads also on this page.
     Page five is a small grouping of some of my favorite glass animal miniatures.  Some of these like the bird and rooster came from my grandmother.  That's where my love of these little treasures started.  From what I understand these little animals were included as premiums or little surprises/collectibles in things like flour or sugar.  I added some more Twill tape to this page and like the others splattered a little Vintage Photo Distress Crackle paint aoround.  I smashed a bottle cap flat. added another one of the Tim Holtz Salvage Stickers in the middle, and covered it with Glossy Accents.
     The last page includes another Jenni Bowlin Vintage Black Journaling tag and an Tim Holtz Adage Ticket held on with one of his paperclips.  In the bottom corner I added another one of the Steampunk rub-ons to some Brown Kraft Cover Weight cardstock and cut it out.  I popped a metal label holder over the top of it.
     Each of the four CD sleeves contains a pull out tag. I used a circle punch to make cut outs for the tag pulls.  For the tags in each pocket, I cut the tag from Brown Kraft Cover Weight cardstock and added a pull tab punched from Buff Ivory Cover Weight cardstock.  I inked the edges and added some more of that beautiful 7 Gypsies paper to one side.  I can add some more photos as my collection grows.  The other side was stamped in the center with the Large Journaling Block clear rubber stamp. I will use these journaling spots to records where my treasures have come from. That was masked off and I stamped around the edges with some stamps from my stash.
     I know this was a long post, but as you can see, there is a ton of stuff in this album.
     You can get your entry for this week's "Favorite Things" challenge linked up by 6:00 p.m. EST on Sunday for a chance at Top Three, Feature Me Friday, and our monthly $15.00 Kraft Outlet store voucher drawing.  Everybody has favorite things so let's see yours.
Happy Monday!


Kraft Outlet Supplies

Lunch Bag Kraft cardstock
Brown Kraft Cover Weight cardstock
Buff Ivory Cover Weight cardstock
Lunch Bag Kraft CD Sleeve Envelopes
Round Metal Edge Grungy Prim Tags
Vintage Dictionary Pages
Jenny Bowlin Studio Vintage Black Journaling Cards
7 Gypsies Mini Gypsy Ephemera Labels
Earthy Hemp Cord
7 Gypsies Steampunk Time Rubbings
Tim Holtz Salvage Stickers Lost and Found
Twill Tape

Supplies from my stash that are also available in the Kraft Outlet store
Tim Holtz Memo Pins
Tea Dye, Vintage Photo, and Walnut Stain Distress inks
Jenny Bowlin Studio Chipboard Buttons--milk caps
Tim Holtz Adage Tickets
Large Journaling Block Clear Rubber Stamp
Silver Bottle Caps

Other Supplies

Papers:  7 Gypsies
Stamps:  Inkadinkado "Unknown name" and Stampabilities "Ornate Textured Background"
Ink:  Black Soot Distress ink
Paint+:  Vintage Photo Distress Crackle paint, Vintage Photo Stickles, Glossy Accents
Tools:  EK Success 1 1/2" circle punch, Stampin Up Extra Large Round Tab punch, sewing machine
Miscellaneous:  Tim Holtz Hinge Clips and Mini Paperclips, button from my stash, Prima flower, The Paper Studio brads, Making Memories metal label holder

Sunday, July 17, 2011

A Day For Daisies Celebration card #2

     This is my second project for the A Day for Daisies celebration at CDAC.  This is another one of the fabulous freebies that Tammy gave us to play with.  You really need to check out her store.  There's no way you cannot find something you'll like there.  She also has an etsy store that offers a great 3/$10.00 deal.  And she has a weekly challenge blog too.  Lots of fun!
     In keeping with her celebration theme, this is of course "sugar and spice and everything nice" for a girl birthday.  I decided to go the vintage route on this one so the colors are soft and there's lots of inking.  I wanted to dress the ribbon up a bit so I attached some beads through the punched piece.  I added some machine stitching too, but NO I did not sew around that circle.  LOL  I used the plastic canvas template trick I showed in a tutorial a while back.  Makes a perfectly round sewing line, something I could NEVER do with a sewing machine.
     You have until Thursday to enter your card for the prize drawing.  The freebies are only available through today (7/17) and you must use them to play along.
     I still have at least one more ADFD project to share with you sometime this week.  LOL
     I'm entering this card into the Simon Says Stamp "Anything Goes" challenge.
     Be blessed!


Supplies

Papers:  K and Company Classic K Bailey collection, Recollections
Stamp:  A Day For Daisies "G is for Girl"
Ink:  Vintage Photo Distress ink
Copics: BG10, BG11, BG13, CO, C6, C8, E000, E00, E11, E31, E35, E50, E51, E53, G29, G40, G94, R20, R22, R24, R30, R32, Y02, YR20
Tools:  Martha Stewart Doily Lace edge punch, Nestabilites Standard Circles Large (S4-114) and Classic Scalloped Circles Large (S4-124)), sewing machine, Bow Easy, plastic canvas template
Miscellaneous:  Offray ribbon, beads from my stash, The Paper Studio pearls

Saturday, July 16, 2011

It's a celebration at A Day For Daisies!

EDIT:  You only have through Sunday (7/17) to grab the freebies.
     You'll find lots of projects on my blog featuring the uber talented Tammy Thompson's images from A Day For Daisies.  I just love her style and I'll warn you, you'll be seeing a lot more of her images here.  My ADFD folder still has lots of images to work with in it and I keep adding more!  LOL
     Anyway, on Friday, Tammy started a special celebration over at the ADFD group at CDAC.  She hit 300 members there and there's a party going on this week to celebrate!  She has offered three fabulous freebie images to the group members there to play along for chances at some great prizes.  If you're not a member, she'd love to have you join in the fun.  You can find the group page here to join.  And if you are a member, make sure you pop over there and snag those adorable freebies, make a card with each one you download and join in the celebration fun.  I grabbed all three so you'll see two more projects from me.  This one is the "boy" card.  You know, "snips and snails and puppy dog tails".
     Hope you're having a great weekend.  It's been raining here.  YAY!  I've so missed those big thunder booming summer storms.  Everything's so crispy and brown from the drought so the rain is a godsend.
     I'm entering this card in the Simon Says Stamp "Anything Goes" challenge.
     Hugs to you all!


Supplies

Papers:  My Mind's Eye, Bazzill, Recollections, Copic X-Press It Blending card
Stamp:  A Day For Daisies "B is for Birthday"
Copics:  BG01, BG05, BG07, C8, E31, E35, E50, E51, E53, G29, G82, R24, R27, R29, Y21, Y26, YG67
Tools:  sewing machine
Miscellaneous:  Basic Grey button, Celebrate It ribbon, Darice Hemp Cord

Friday, July 15, 2011

The Outlawz Copic Challenge Guest Designer #3

     Isn't this guy too funny!  He's a great digi image from Make It Crafty called "Cheery Santa".  I had a few scraps left over from my Basic Grey Jovial pad to create this card with for this weeks Christmas in July challenge at The Outlawz.  We've been having so much fun this month sharing our creations for the challenge.  We'd really love for you to come over and play along with the challenges.
     Ahhh . . . one Christmas card down.  LOL
     I'd like to enter old Ho Ho into the following challenges:

Stamp Something--Christmas in July
Stampin with the Dragon--Christmas in July
House That Stamps Built (Repeat Impressions DCC76 Designer’s Choice Challenge)—Christmas in July
Craft Us Crazy—Christmas in July
Simon Says Stamp--Anything goes

     Happy Friday!


Supplies


Papers:  Basic Grey Jovial, Bazzill, Recollections, X-Press It Copic Blending Card
Stamp:  Make It Crafty "Cheery Santa", Whimsy Stamps "Holiday Circle Postmarks"
Ink:  Memento Tuxedo Black
Copics:
             skin E00, E02, E000, E11, E40, R20
             clothing R24, R27, R29, W1
             boots N1, N3, N5, N7
             shadowing W1, W3
Tools:  Nestabilities Classic Scalloped Circles Large (S4-124), EK Success 1 1/2" circle punch, Martha Stewart Holly punch
Miscellaneous:  Bakers Twine, DMC embroidery thread, Prima poinsettia flowers, Studio 112 pearl

Guest Designer at Phindy's Place

     Last month I was blessed to have two of my cards chosen as Card of the Week at the Phindy's Place Challenge Blog AND to be asked to be a Guest Designer in July.  Thank you Phindy and DT ladies!!
     This is the card I created for my Guest Designer spot.  I've used the "Pretty Blooms" stamp from Phindy's Place and colored it with Copics according to the "Pretty Pastels" theme.
     My papers are from a new purchase, a Kaisercraft English Rose 6 x 6 paper pad.  I just love the soft vintage colors.  Soft blues, greens and pinks are my favorites to work with.
     It looks like Phindy's is going to be another folder in my digi library that is well stocked.  I really enjoyed working with this image and I have several others in my arsenal already that you'll be seeing (and have seen--Speedster is one of Phindy's and so is that sweet little bear with the carriage from a couple of weeks ago).  If you join in the challenges you just might win and be able to add a few of Phindy's images to your own stash of digis.
     Hope you like my little fashion plate gardener.  LOL 
     I'd like to enter her into the following challenges:

Totally Papercrafts--girly girl
Fussy and Fancy--summer
Crafty Sentiments—use stitching
Do You Stack Up—faux or real stitching
Pixie Dust Studio—girly girly
Rainbow Lady's--stitching, real, faux or pinked edges
The Rubber Café—use spellbinder dies
Crafts and Me—summertime
Divas By Design—pastels
Simon Says Stamp--anything goes
Aud Sentiments--sentiment with at least two words
Digital Tuesdays--use one or more dies
Going Grey with Scrap Creations--use at least 2 DP's and 2 embellishments
The Stamping Boutique--summer scene
Tuesday Throwdown--Fun in the sun
Crazy Challenge--summertime
Creative Stamp Friends--summer
DDH Challenges--summer
Stamps R Us--through the garden gate
Crazy 4 Challenges--summer themed

     Have a fabulous weekend!

Supplies


Papers:  Kaisercraft English Rose, Bazzill, Recollections
Stamp:  Phindy's Place "Pretty Blooms", Papertrey Ink "Mixed Messages"
Inks+:  Memento Tuxedo Black, Victorian Velvet Distress ink, Marcy Uchida white gel pen, Inkadinkado Blending Chalks, Diamond Stickles
Copics:
             skin E000, E00, E04, E11
             hair E31, E35
             clothing R000, R00, R11, R12, E50, E51, E53
             flowers E04, R000, G82, G85, G94
             watering can G40
             ground G82, G85
Tools:  Nestabilities Classic Ovals (S4-110), Classic Scalloped Ovals Large (S4-111), and Lacey Squares (S4-295); Martha Stewart Eyelet Lace edge punch and Frond punch; sewing machine
Miscellaneous:  Offray ribbon, fabric roses, fiber, and pearl stamens from my stash, Recollections pearls

Tuesday, July 12, 2011

Papercraft Star Challenge #53

     I haven't made a card like this in a long time, but I knew when I saw the sketch for this week's challenge at Papercraft Star, that it would be the perfect time for me to try out a tutorial my sweet friend Ira had on her blog a couple of weeks ago.  Here's a link for the tutorial.  She made several gorgeous flowers out of fabric.
     I'm sure most of us have seen these "singed" flowers made out of silk or organza circles, but the little extra step Ira added in made all the difference in how they look.  I have to admit I singed mine a little too much and had to trim off some of the more crispy parts.  LOL  However, the darkened part actually adds a sense of realism to the flower so there's still a little left on the petals.  I added lots of sparkly gold on this card with ink, a gel pen and the pretty edge of the ribbon.
     If you missed my newsy post a while back you might not know that there have been some administrative changes at Papercraft Star.  We are now being led by the awesome Jan Del Bone and you will be seeing several changes over at the Papercraft Star challenge blog. 
     Starting this past week the winner of the challenge is being chosen by the DT.  We've also extended the deadline for getting your entries in until 6:00 a.m. EST on Mondays.  You can check out the Papercraft Star challenges page on the blog and see the new challenges Jan has posted for the rest of this month and August.  The challenges will be a little broader now and you'll see a lot of photo inspirations for you to work off of. 
     Probably our most exciting news is that we will have a permanent weekly sponsor starting in August.  We've struck up a partnership with The House Across the Bay Etsy Shop.  The shop is loaded with fabulous digital collage sheet images that can be used for everything from card backgrounds to ATC's to whatever your imagination can come up with.  You can read more about the partnership and what it means for Papercraft Star participants in Jan's post at Papercraft Star here.
     And last but not least, be on the look out July 24th for the opening of our Design Team call!  I will be heading this up with LOTS of help from boss lady Jan.  We'll have more info out on that soon.
     Now, like I said, you now have until early Monday morning to get your project linked up.  This is a great sketch and we'd love to see what you can do with it.
     Happy Wednesday!


Supplies


Papers:  My Mind's Eye, Recollections
Stamp: Stampabilities Ornate Textured Background
Inks:  Brilliance Galaxy Gold Dew Drop, Sakura Gelly Roll Gold pen
Tools:  Nestablilites Labels Four(S4-190) and Classic Scalloped Circles large (S4-124), Sizzix Tim Holtz Alterations Brackets On the Edge die
Miscellaneous:  silk fabric, pearl beads from my stash, Offray ribbon, Recollections bling

Commenting Problems

Hi All!
Several of you have emailed me to let me know that you are having problems posting comments here on my blog.  It doesn't seem to be affecting everyone so I'm not really sure what the deal is.  My Followers gadget was missing in action for a couple of days too.  ?????????
Anyway, I asked Blogger for help and was given two suggestions.  The first one was a bit above my computer knowledge, but the other was to change my comments to the full page version.  If anyone who has been having trouble posting here has a spare moment today, can you try to leave a comment on this post and see if this may have solved the problem.
Thanks!

Monday, July 11, 2011

The Kraft Journal Challenge #27

     Something borrowed or something blue is the theme of this weeks challenge at The Kraft Journal.  For my project I've used a Square Kraft Pillow Box to create a gift box that could be used for a bridesmaid gift.  I punched the edges of a piece of Buff Ivory Cover Weight cardstock and then layered some pretty K and Company paper on top of that.  I tied some Twill Tying Tape in a bow around the box and added a Scalloped Grungy Prim Tag that I stamped "Thank You" on with one of the stamps from the Thank You Clear Rubber Stamp set.  I also made a place card from some Brown Kraft Cover Weight cardstock, more of the Buff Ivory, K and Company papers and twill tying tape, plus I stamped the flowers with another stamp from the set and wrote "Kim" on it.  The pillow box was easy to dress up and could be done in so many different ways. There are also different sizes of these boxes at the Kraft Outlet store.
     Happy Monday!


Kraft Outlet Supplies

Square Kraft Pillow Box
Brown Kraft Cover Weight cardstock
Buff Ivory Cover Weight cardstock
Twill Tying Tape
Scalloped Grungy Prim Tag
Thank You Clear Rubber Stamp set

Other Supplies

Paper:  K and Company Julianne
Ink:  Memento Paris Dusk
Tool:  Martha Stewart Lace Heart edge punch

Sunday, July 10, 2011

I ♥ You More

     I had so much fun making this card, but I really had to use some brain power.  I knew I wanted to make the punched border, but I wanted it bigger than the standard measurements you can use for the MS punch around the page sets.  So I had to do a little ruler work to figure out how to punch and cut for the size I wanted.  It wasn't too bad, just a little time consuming.
     All the DP's except the butterfly are from the Basic Grey Curio collection.  Almost all the edges are distressed with scissors and inked with Distress inks.  Also on the first DP mat, I used some Versamark and Distress embossing powder around the edges.
     I had to make the die cut that's behind the image on my Cricut cause I just didn't have the right size Nestie to fit there.  Poor ole dusty Cricut.  :-(  I used a gold gel pen to draw an inside border on the last layer. 
     The flowers and lace were all sponged with distress ink and I sprayed the lace with some Glimmer Mist too.
     The butterly (my newest MS purchase--couldn't waste that 50% off coupon could I? LOL) is covered with Rock Candy Crackle paint.
     Finally, the image is the sweet little "Sophie" from Mo's Digital Pencil.  Sophie and her friend are colored with Copics and framed with some more Distress ink.
     I didn't get to play along at Mo's for the chance at a Guest spot last month because we were on our awesome vacation, but I'm going to give it a shot this month.  Hope you ladies like her.  :-)
     I'd also like to enter Sophie in the following challenges:

Mark's Finest Papers--die cut as a background mat
Stamp Something--bugs or butterflies
Stampin' For the Weekend--wings and things
Mo's Digital Pencil--vintage with distressing and lace
Craft Us Crazy--distressed/vintage

Have a wonderful brand new week!


Supplies

Papers:  Basic Grey Curio, Bazzill, Recollections, Moxie, Copic X-Press It Blending card
Stamp:  Mo's Digital Pencil "Sophie", Raindrop Echo Designs "Dorcas' Sentiments"
Inks+:  Frayed Burlap and Walnut Stain Distress inks, Vintage Photo Distress embossing powder, Versamark, Rock Candy Crackle paint, Old Lace Glimmer Mist
Copics:
            skin E000, E00, E11, E13, R20
            hair E50, E53, E57
            clothing E40, E41, R000, R20, R21, R22, R24, YR000, G94
            doll YR61, YR65, E97, Y32, Y35, E11, E31, E43, CO, C2
Tools:  Martha Stewart Vintage Floral punch around the page set, Frond punch, and Monarch Butterfly punch, Cricut, Storybook cartridge, Nestabilities Classic Ovals Large (S4-110) and Classic Scalloped Ovals Large (S4-111)
Miscellaneous:  Prima and Recollections flowers, Recollections pearls, lace from my stash

Friday, July 8, 2011

The Outlawz Copic Challenge Guest Designer #2

     This is my second card as the July Guest Designer at The Outlawz Copic Challenge,  when I saw the theme for this weeks challenge, I have to admit I cringed.  Monochromatic blue--YIKES!  Well it turned out to be a lot simpler than I thought.  I decided to use this beautiful image from Michelle Perkett and use lots of soft blues.  The papers are from K and Company's Julianne collection.  I think they are so pretty and I've barely touched the pad yet.  Yay!  Lots more card materials. :-)
     I'm sure the ladies on the Copic Challenge DT will welcome you with open arms if you'll come play along this week.  They really are a fun and supportive group so dig out all those blue parts and pieces and come join in the fun with us.
     I'd like to enter this card in the following challenges:

Flutterby Wednesday--open/must include butterfly, fairy, or angel
Truly Scrumptious--things with wings
Clear It Out--wings
Bunny Zoe's Crafts--fairies

Thanks for stopping by!


Supplies


Papers:  K and Company Julianne, Bazzill, Recollections
Stamp:  Michelle Perkett "Lilly the Fairy of Enchantment"
Ink:  Worn Jeans Distress Ink
Copics:
            skin E000, E00, E11, R20
            hair E35, E37
            clothing B91, B93, B97
            wings B41, B52
            flowers YR20, YR21, Y35, G82, G94
Tools:  sewing machine
Miscellaneous:  lace from my stash, Inkadinkado Blending Chalks, Jolee's pearls, Hug Snug Seam Binding, Blue Skies Glimmer mist